Post map
ToggleIf you are the owner of a business website and are using Facebook ads to increase traffic or generate more conversions on your website, understanding the Facebook Pixel is important. In this article, Optimal FB will explore with you the Facebook Pixel and how to test custom conversion Facebook to help improve the effectiveness of your advertising campaigns.
Learn about Pixel on Facebook
Facebook Pixel is a JavaScript code created by Facebook to help advertisers easily track and measure customer behavior on their website. As simple as installing a security camera in your home, Pixel helps you record and analyze user activities on your website. This allows you to evaluate the effectiveness of your Facebook advertising campaigns and better understand how customers interact with your content.
What are Facebook custom conversions?
With custom conversions, you can set up rules for specific events. When you create these rules, you can measure customer actions in more detail. For example, you can filter out all purchases of women’s shoes over $40. You can then use these custom conversions as effective targeting and reach the users most likely to take the actions you expect.
For example, let’s say an online clothing store wants to track online sales for men’s clothing products priced over $50. They can create a custom conversion event that fires every time someone purchases this product. To do this, they can select “Purchase” as the conversion event and set up the following two rules:
- URL-based rule: The URL where the purchase was made contains the keyword “men”.
- Rules-based on parameters: Products with a value greater than $50.
Once they have received a sufficient amount of data from these custom conversions, they can use them to set effective goals. This means they can show their ads to users most likely to purchase men’s clothing products priced above $50.

What are the benefits of using custom conversions on Facebook?
Using custom conversions offers many valuable benefits for tracking and optimizing your advertising strategy:
- Event filtering: By adding rules for standard or custom events, you can better understand customer behavior. For example, you can create a rule to measure the number of people who buy products in a certain color or price range. This helps you analyze details and better understand your target audience.
- Set up standard events without additional code: If your site already has Meta Pixel base code, you can use URL rules to record standard events without adding an event code webpage. This saves time and effort in configuring and managing pixels on your website.
- Custom conversion performance goals: When you create an ad in Ads Manager on Meta, you can choose a custom conversion performance goal. This allows you to optimize your advertising strategy based on the specific events you care about. Custom targeting helps you focus on reaching users who are likely to take the desired action.
- Check what you share with partners: You can share individual custom conversions instead of sharing your entire data source with business partners. This helps protect your important information and also gives you control over how data is shared and used.
Using custom conversions helps you capture and analyze data accurately and effectively, helping you optimize your advertising strategy and boost the performance of your marketing campaigns.
How to test custom conversion Facebook. Use Facebook custom conversions
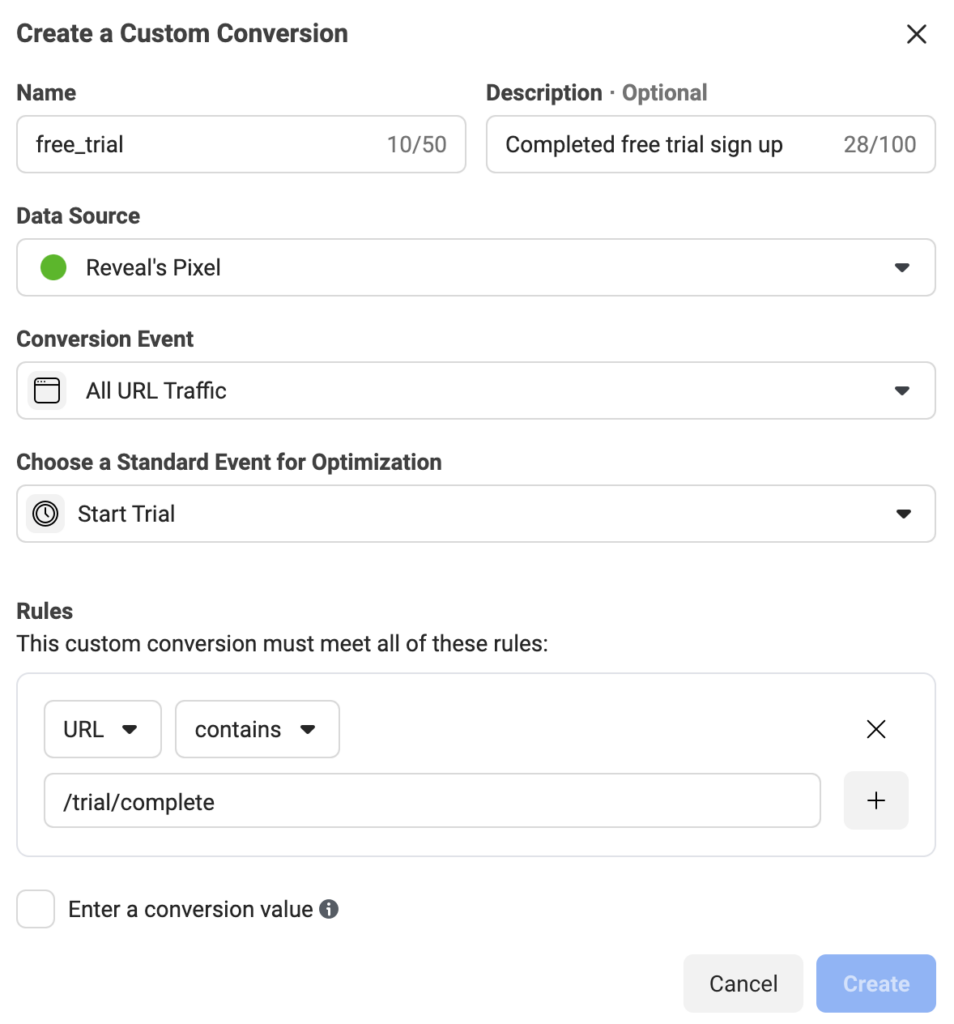
To use custom conversions to filter previous events, you need to set up Facebook Pixel and create standard or custom events on your website. The steps to use Facebook custom conversions are as follows:
- Step 1: First, visit the Event Manager on Meta.
- Step 2: Next, click on Custom Conversions in the top left menu.
- Step 3: Click the Create Custom Conversion button.
- Step 4: Enter a name for your custom conversion and add a description if needed.
- Step 5: Select the data source for your custom conversions.
- Step 7: Select the conversion events you want to track.
- Step 8: If you select All URL visits or custom events, you’ll see the option to select standard events to optimize. Keep the option they suggest or choose a category that best describes the conversion event you’re interested in.
- Step 9: Set up rules using URL or event parameters. You can select the parameters that you currently send with the selected event. If you don’t see the parameter you want to select, update your pixel setup or the Conversion API to send the parameter with the event.
- Step 10: You can also click the plus sign (+) if you want to add another rule.
- Step 11: If necessary, you can select the cell to enter the conversion value and enter your value. Only use this field if your custom conversion events don’t already have conversion values. Remember to only use integers and not include any other characters.
- Step 12: Finally, click the Create button to complete the process of creating your custom conversion.

Note that each ad account or business profile is limited to a maximum of 100 custom conversions. However, you can delete unnecessary custom conversions and add new ones as needed.
In the article on Optimal FB, we have listed the most accurate detailed information. We hope that the content we share can help you learn about Facebook custom conversions and go through the steps to test and use Facebook custom conversions successfully.
Contact Info
Are you in need of Facebook advertising or need to rent a quality Facebook advertising account? Don’t worry! Optimal FB is a unit specializing in providing reputable Facebook accounts, as well as direct advertising support. Provides all types of advertising accounts such as facebook casino ads to help you reach and create fast conversions.
Frequently asked questions
To remove a creator on Facebook, you can follow these steps:
-First, visit your personal or business page on Facebook.
-Next, select “Settings” or “Settings” (if you are using Facebook in English).
-At the settings interface, select “Content Creators” or “Content Creators” (if available).
-Find and select the content creator you want to remove from the list.
-Finally, select the “Delete” or “Remove” option and confirm your action when requested.
After completing these steps, the creator will no longer appear on your list.
To set up the Facebook Pixel, you can follow these steps:
-Access Facebook Events Manager by logging in to your ad account.
-Select the “Pixel” option from the top left menu.
-Click the “Add Pixel” button and enter a name for your Pixel.
-Copy the generated Pixel code, paste it on your website between tags, and let it be loaded when your website is opened.
– Customize your Pixel’s settings by choosing the events you want to track, like page views, purchases, or form fills.
-Once your Pixel has been configured, tap “Finish” to complete the setup process.
The pixel will start collecting data, and you can track the performance of your ad campaigns on Facebook.


